


Steve A
-
Posts
338 -
Joined
-
Last visited
Posts posted by Steve A
-
-
To display a calendar in a section of a page, such as a tab or drop-down, that is hidden when the page first loads:
-
Use a call to the $Trumba.addSpud() method to load the calendar spud when a viewer first displays the hidden section.
For example, in the case of a tab control, use an event handler to make the call.
- Provide the ID of the div (the tab, drop-down, or other section) that contains the spud by including the spudId argument in the $Trumba.addSpud() method.
For a demonstration of how to display a calendar in a tab, view the commented source code.
JQuery Tools tab control
<!DOCTYPE html PUBLIC "-//W3C//DTD XHTML 1.0 Transitional//EN" "http://www.w3.org/TR/xhtml1/DTD/xhtml1-transitional.dtd">'>http://www.w3.org/TR/xhtml1/DTD/xhtml1-transitional.dtd">
<html xmlns="http://www.w3.org/1999/xhtml">'>http://www.w3.org/1999/xhtml">
<head>
<title>JQuery Tools Tab Sample</title>
<link rel="stylesheet" href="http://jquerytools.org/media/css/tabs.css"/>
<link rel="stylesheet" href="http://jquerytools.org/media/css/tabs-panes.css"/>
<style type="text/css">.panes div { height: auto; }</style>
<script src="http://cdn.jquerytools.org/1.2.5/full/jquery.tools.min.js" type="text/javascript"></script>
</head>
<body>
<script type="text/javascript" src="http://www.trumba.com/scripts/spuds.js"></script>'>http://www.trumba.com/scripts/spuds.js"></script>
<script type="text/javascript">
var calendarLoaded = false;
function addSpudToTab() {
$Trumba.addSpud({
webName: "trumbauevents",
spudType: "main",
spudId: "divSpud"
});
calendarLoaded = true;
}
$(function () {
$("ul.tabs").tabs("div.panes > div", {
onClick: function (event, tabIndex) {
if (tabIndex == 1 && !calendarLoaded)
addSpudToTab();
}
});
});
</script>
<!-- the tabs -->
<ul class="tabs">
<li><a href="#">Tab 1</a></li>
<li><a href="#">Calendar Tab</a></li>
</ul>
<!-- tab "panes" -->
<div class="panes">
<div>First tab contents.</div>
<div id="divSpud"></div>
</div>
</body>
</html>JQuery UI tab control
<!DOCTYPE html PUBLIC "-//W3C//DTD XHTML 1.0 Transitional//EN" "http://www.w3.org/TR/xhtml1/DTD/xhtml1-transitional.dtd">
<html xmlns="http://www.w3.org/1999/xhtml">
<head>
<title>JQuery UI Tab Sample</title>
<link rel="stylesheet" href="http://code.jquery.com/ui/1.8.21/themes/base/jquery-ui.css" type="text/css" media="all" />
<style type="text/css">.panes div { height: auto; }</style>
<script src="http://ajax.googleapis.com/ajax/libs/jquery/1.7.2/jquery.min.js" type="text/javascript"></script>
<script src="http://code.jquery.com/ui/1.8.21/jquery-ui.min.js" type="text/javascript"></script>
</head>
<body>
<script type="text/javascript" src="http://www.trumba.com/scripts/spuds.js"></script>
<script type="text/javascript">
var calendarLoaded = false;
function addSpudToTab() {
$Trumba.addSpud({
webName: "trumbauevents",
spudType: "main",
spudId: "divSpud"
});
calendarLoaded = true;
}
$(function () {
$("#tabs").tabs({
select: function(event, ui) {
if (ui.index == 1 && !calendarLoaded)
addSpudToTab();
}
});
});
</script>
<div id="tabs">
<ul>
<li><a href="#tabs-1">Tab 1</a></li>
<li><a href="#tabs-2">Calendar Tab</a></li>
</ul>
<div id="tabs-1">
<p>First tab contents.</p>
</div>
<div id="tabs-2">
<div id="divSpud"></div>
</div>
</div>
</body>
</html>How the spud code works and how to customize it
Examples
https://www.trumba.com/demo/TabSampleJQueryUI.htm
https://www.trumba.com/demo/TabSampleJQueryTools.htm
-
Use a call to the $Trumba.addSpud() method to load the calendar spud when a viewer first displays the hidden section.
-
We currently do not have support to add events to a fan/business Facebook page directly. Another option for you is to use a third-party application that can take the RSS feed from your Trumba published calendar. You can find the link for your RSS feed by going to Publish>Feeds tab and you will see links for RSS, XML and iCal. In the third-party readers, these can often times take a feed and populate your Facebook page.
-
There is not a way to download these statistics automatically. We do store 3-months of statistics within your account, so you will just want to make sure you access the Publisher Dashboard once a month to download/save the stats from the two previous months if you plan to keep this data. We do not have the ability to go beyond the three month time period.
-
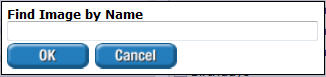
You can locate/search images within the Event Image and Detail Image fields. If you have either or both of these fields included in your event template, you will notice to the right of the Event image and Detail image fields a small search/magnification icon:

When you click this search icon you will see a popup in the middle of the screen:
As you type it returns a list of images that find a match/text within the image name if you are properly naming the images on your accounts. You will have to type in at least two characters to invoke the search. For example, if you type in “so” it will return the following images that match this search:
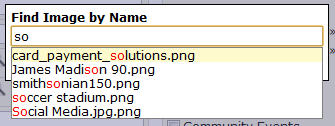
You then pick an image from the search results and select OK, the popup will close and populate the image field even if the image isn’t in the regular image drop down (still limited to displaying 100 frequently used images):

To ensure the search functionality works well for you, please ensure that during the import of an image that you enter a "friendly" display name for the image. At any time you can edit the image that has been added to an event and change the display name. You can also select the Images tab and edit each image and rename images so the display name more clearly identifies that images.
-
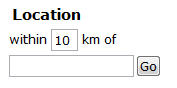
The Location Search Control Spud can be set up to support either miles or km.
To set this up, first select the published calendar on your account so it has a black check mark next to it. Select Publish>Publish Settings tab and then click Edit Publish Settings. Under the Publish Settings section locate the Distance unit of measure. If you want the Location Search to default to kilometers select the km option and click OK.

On the Control Spuds tab, set up the Location Search spud and it will default to km.
-
Trumba can support all of these scenarios.
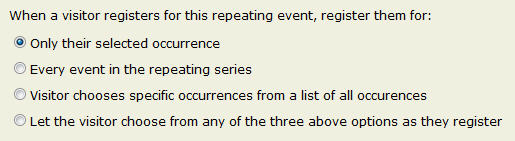
The preferred way of setting these up would be to have individual events with event registration, especially when it comes to sending out invitations to register for the event. If you do create a weekly repeating event with registration, you can set up the registration so that a visitor can select and register for only their selected occurrence; every event in the repeating series; visitor chooses specific occurrences from a list; or let the visitor choose from this list of options.
These options are only valid if the event registration is set up with Open Sign Up. These options are not valid for when you Send invitations to register for an event.
To recap:
1. Create a weekly repeating event for our meeting - You can currently do this, however I would recommend setting the events up as Open Sign Up with the option for the visitor to register for only their selected occurrence.
2. Invite the individual attendees via the "Distribution List" - Not recommended with events in a repeating series as they will not be able to select the specific event in the series they want to register for.
3. Determine how many days in advance the Event Registration should be sent out (i.e. 4 days before) - We do have this option as the invitation emails will be sent out when you click the OK button on the Pending Email screen that appears after clicking OK on the event registration screen.
4. Have Trumba automatically send out a weekly recurring invite (i.e. 4 days before) for each individual weekly meeting - We currently cannot do this, and this would be something you would have to manually set up and send out. We do offer a weekly email that can be sent out for a published calendar that you can schedule on a specific day of the week. If you do this, again I recommend setting up the events to be an Open Sign Up, and make sure the people you want to register for the events are part of the weekly email distribution list.
5. Allow each member the ability to register for each weekly meeting (i.e. 4 days before) - The only way currently to do this is when the event registration is setup as an Open Sign Up, as you can set it so they can Only their selected occurrence. This option does not apply to sending out invitations.
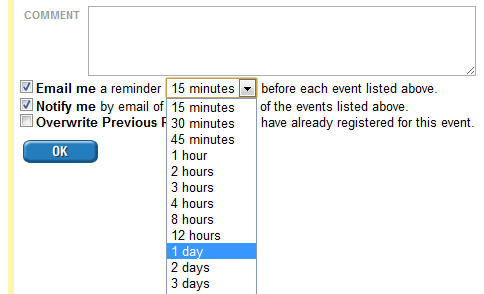
6. Have a reminder sent out 1 day before (or any other amount) - You can set up both a 1st and 2nd reminder that can be sent out to registrants. You can set the preferred time frame prior to the start date/time to send the reminder along with a custom message.. In addition, when a person registers for an event there is the option at the bottom of the registration form they can select to also be emailed a reminder minutes/hours/days/weeks before the event starts.
-
If you have recently reset your password or requested a new password, you may find that you cannot log in to your Trumba account.
If you have issues logging in to your Trumba account, try clicking this link to force a full sign out (https://www.trumba.com/t.aspx?z=PageThunderSignOut) and then sign in again at www.trumba.com.
After you do this it is a good idea to close all instances of the browser and then restart the browser and go to www.trumba.com and sign in again using your email and password. -
We do support an animated promotion spud with images (Event Slider Promotion Spuds) as well as on the Fader and Vertical Crawler Promotion Spuds. The Photo Upcoming Promotion Spud can be used to display just images, however it does not support animation.
Any images that are on an event calendar or promotion spud are not hyperlinked to the event, with the exception of the Event Slider. We also offer the Tile calendar view and images on the Tile view are hyperlinked to the event details.
To add images, select your published calendar and click Publish>Promotion Spuds tab and if you are already using these spuds, select Edit Settings & Styles. If you are not yet using them, click Add a Promotion Spud in the upper right corner and select them from the list. On the Settings tab you will see the Image Options section where you can enable images for the top, bottom, left or right and specify the width/height.
-
We do support a small subset of HTML tags within the Description field. You can try these tags as this will give you a bulleted list:
<ul>
<li>Coffee</li>
<li>Tea</li>
<li>Milk</li>
</ul>If you have a Trumba Connect account, the built-in Description field, and any of the Multi-line custom fields, have the HTML editor where you can use the bullet list option.
-
If your account is using the Event Submission Form add-on, you can hide the "All Day" option on the event submission form to prevent a person from submitting an event as an All Day event. You can locate this by going to your published calendar in Trumba and click Publish>Event Submission tab and click Edit Settings. You can uncheck: Allow All Day Events and then click OK to save the changes.
-
You can customize the actions that appear at the top right corner of your published calendar. For example, you can show just the Print option or any combination of these four actions. The setting can be found by selecting your published calendar and click Publish>Calendar Spuds tab and click Edit Settings & Styles for the Main calendar spud and select the Calendar Actions Panel tab. Here you will see the options to hide/show those options.
-
While the correct way to do underlining is with a CSS style, we do not currently allow CSS in the Description or other multi-text [fields due to security concerns (referenceing scripts). We do however allow a few basic HTML tags for bold, italic, bullets; anchor tag and img src tag in the Description field.
As a tip, it is suggested to not underline text if it is not a hyperlink. The website W3Schools.com states that the underline tag is deprecated so it is a tag you may want to avoid. -
When you log in to Trumba, and often times people do check this option Automatically sign me in on this computer , that will expire over time and require you to log back in by entering your email and password.
In addition a cookie has been installed to your browser. If you are having problems logging in, clear your browser cache and delete your cookies then make sure to close ALL instances of the browser you are using. Bring the browser back up and you should now be able to log back in.
If you need your password reset, please email support@corp.trumba.com -
There is the Event Detail Link for both the Classic Table and List calendar views. To locate this, select your published calendar in Trumba and click Publish>Calendar spuds tab and then click Edit Settings & Styles for the List calendar view. Select the Events: Default tab and select the [add new field] drop down menu. From here you will see the Event Detail Link value you can select. Once selected the default label appears as “More…” that you can customize. Repeat the same steps with the Classic Table view, however for this view you will find the [add new field] on the General Settings tab.
-
If you cannot sign-in to your Trumba account (you are taken back to the sign-in page with no failure message), the fix is to perform a sign-out which deletes the Trumba cookie used for sign-in. Go ahead and click this link and once you have done this you should be able to sign-in successfully.
https://www.trumba.com/t.aspx?z=PageThunderSignOut -
We do have a permalink which you can pull for each event. To locate the permalink, go to your published calendar and when you click on an event to view the event details, you will see the Permalink in the lower right corner of the event detail page. When you click the Permalink you will notice the URL of your webpage will change and that is the permalink you can copy/paste and use. In addition to the permalink there is also the QR code icon to the right of the permalink and when you click on the link, the QR code page will also display the URL of the permalink that you can copy. You will have to do this for each event to capture the permalink.
-
Trumba allows the event image to be included in your Calendar Emails (digest emails) on Trumba Connect accounts. Detail Images and Inline Images are supported in the List calendar view email template.
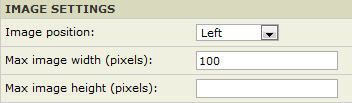
To enable event images to appear with your daily/weekly emails, select the published calendar in Trumba that the email is coming from and then click Publish>Email tab and then click Edit Settings & Styles for the Calendar Email template. If you do not already have your Calendar Email template created, select Add a Calendar Email that appears to the far right. On the Settings tab at the bottom are the settings where you can enable the event image and position it either on the left or right. You can also set the width and height that the images should be scaled.
-
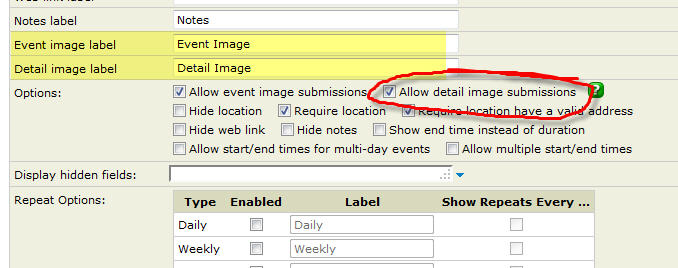
Within your Trumba account, your event template may be set up to allow both the event image and detail image. The event image is typically a small thumbnail image that appears on the main calendar view and the detail image is typically a larger and/or different image from the event image. The detail image appears when a site visitor clicks on an event title to view the detail about the event.
For accounts that have an event submission form, you can change the label for both event image and detail image as well as decide whether or not you want to allow a submitter to upload only an event image and not a detail image.
To change these setting, select your published calendar in Trumba and click Publish and click on the Event Submission tab and click Edit Settings. On the settings for the event submission form locate the Event image label and Detail image label fields to change the labels. Under the Options section, uncheck the option to Allow detail image submissions if you do not want submitters to provide a detail image.
Note: This option is checked by default and users can submit a detail image if you have detail image as a field added to your event template and you allow image submissions on the event submission form.
Click OK to save your changes.
-
The Prev/Next buttons and forward/back arrows on various calendar spuds and promotion spuds can be customized. The settings can be set on a per published calendar is you are using navigation buttons, or if you are creating your own navigation images, these are set on a spud-by-spud basis (there is not a global setting) so you have complete control over which views use which images.
To create and set navigation buttons for a published calendar view, go to Publish Settings>Calendar Spuds tab and select Edit Settings & Styles for the Main Calendar. From here select the Paging Buttons tab.

When you choose Buttons, paging buttons appear automatically in calendar views and the Date Finder promotion spud. You can use this tab to modify the style of the buttons globally, everywhere they appear. See: Paging Buttons tab.
When you choose Images, you set up the images separately in each calendar view you're using (and in the Date Finder promotion spud). This may make sense if you have your own custom images available and want to tailor the button style to the style of the spud. There are no global settings in this case, although you can choose from a small set of common, built-in images. See: How to use custom images for paging controls.
If you would like to upload and use your own navigation icons, in the steps above you will select the Images radio button and then for each calendar view, you will upload an active forward and back button and an inactive forward and inactive back button.
There is also support for the HTML buttons and here is a help topic with more details: https://www.trumba.com/help/publish/pub_icons.aspx
-
Trumba has Paid Registration
If you want to accept payments for events that your visitors register for, you need to establish a payment gateway between your Trumba account and your merchant account.
Supported gateway providers as of July 2020:
- Authorize.net - This gateway allows payment by major credit or debit cards.
- CASHnet - This gateway does not support refunds through the Trumba paid registration interface.
- Higher One® (formerly CASHNet®) - This gateway allows payment by major credit or debit cards and ACH (Automated Clearing House) account debit.
- PayPal Express Checkout - This gateway allows payment by major credit or debit cards and by PayPal.
- InstaMed - This gateway allows payment by major credit cards.
- Stripe - This gateway allows payment by major credit cards.
- TouchNet- This gateway allows payment by major credit cards.
With a Trumba Publisher account, paid events fees are $1 per attendee plus 1% of transaction total (maximum $10). No additional charge for free events.
In an organization that hosts different event types, it’s common to route online payments through different payment gateways according to the event type. In Trumba, you can add as many payment gateways as you want, and you link them with calendars. So to route payments for particular event types through particular payment gateways, you arrange event types by calendar.
You can further categorize event types on a single calendar, through custom fields or other means. However, all payments for events on one calendar will be routed through the same gateway.
Contact Trumba Sales to start accepting payments today. Click here for more information about payment gateways.
-
When you add or edit an event, you enter in the address in the Location field and select Map Link:

You can also enter in Lat/Long coordinates. Trumba remembers the last 50 addresses you have mapped. When you click Recent, this is a fast way to automatically fill in and map the location field without having to retype and map the address manually.
Click here for more information on adding map links to events. -
You can allow your site visitors to quickly post events to Facebook, X (Twitter) and LinkedIn. This is only available on the Event Detail views for the event. The options appear at the bottom of the Event Details screen along with the other Event Actions such as Add to My Calendar, Forward to Friends, etc.
To share a Trumba event to Facebook:
- Click the Facebook icon in the footer of an event detail page.

The Share on Facebook page appears.
- Click the Share to News Feed or Story drop-down at the upper-left of the page, and then select whether to Share to News Feed or Story, Share on a Page You Manage, such as your business or organization page, or one of several other options:


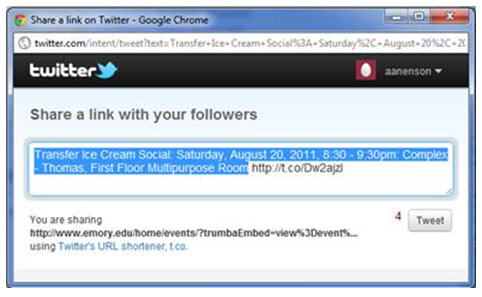
If you are not logged in to X (Twitter) and you select the Post to X option, it will give you a login screen. If you are logged in to X and you select Post to X you will see this screen with your post that you can edit or just click Tweet:
https://www.trumba.com/i/DgC14wEjmO7s9PGWlG6xJYtw.jpg
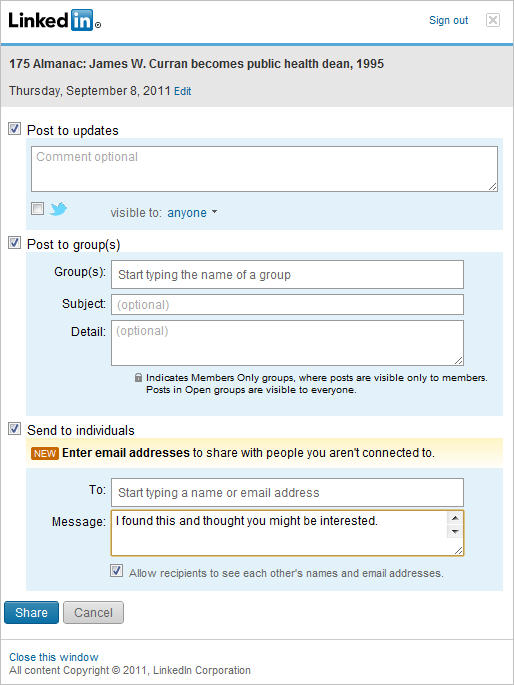
If you are not logged in to LinkedIn and you select the Post to LinkedIn option it will give you a login screen. If you are already logged in to LinkedIn and you select Post to LinkedIn you will see this screen with your post allowing you to post to updates; post to groups and/or send to individuals:
https://www.trumba.com/i/DgC1QDEAtGwlml-1oYnL1-FJ.jpg
The post to Facebook and Twitter icons are enabled by default for all existing published calendars and any new calendars you published, however if you do not want to have these options displayed for your events, you can disable these options. Note: Post to LinkedIn is not enabled by default
To Disable the Post to Facebook, X (Twitter) and LinkedIn options
To control the display of the Post to Facebook, Post to Twitter and Post to LinkedIn options on the Event Detail view for your events, first select your published calendar in Trumba and click Publish Settings>Calendar Spuds tab. Now click Edit Settings & Styles for the Event Detail view. Locate the Footer section and you will see the options to “Show post to Facebook”; “Show post to Twitter” which are enabled by default; and Show post to LinkedIn. Check the appropriate radio buttons to enable/disable the feature and click OK.
Additional Information about images:
When using images with events, Facebook requires all images to be 100 pixels or larger. Anything smaller than 100 pixels will not display in Facebook and may produce an error posting to Facebook. The post to Facebook will always try to pull in the Event Image and if it cannot, it will pull in the Detail Image. For example, if you have an event on your calendar and you are using just the Event Image field and that image is 70px x 70px, the event will post on Facebook without an image. If you are using both an Event Image and a Detail Image and both are 100px or larger, the Event Image will display with the Facebook post. If you are using both an Event Image and a Detail Image and the Event image is 70px x 70px and the Detail Image is 400px x 250px, the Detail Image will display with the Facebook post.


-
We have options on the event detail view to allow visitors to quickly post events to Facebook and Twitter. LinkedIn is also another option that you can enable on the event detail settings. These options are only available on the Event Detail view for the event. The options appear at the bottom of the Event Details screen along with the other Event Actions such as Add to My Calendar, Forward to Friends, etc:

If you select the Post to Facebook icon and you are not logged in to Facebook you will see a login screen for you to log in to your Facebook account.

If you are logged in to Facebook and you click Post to Facebook, you will then see this screen where you can add your comment and then click Share to post the event to your Facebook wall:

If you are not logged in to Twitter and you select the Post to Twitter option it will give you a login screen.
If you are logged in to Twitter and you select Post to Twitter you will see a screen with your post that you can edit or just click Tweet:
The post to Facebook and Twitter icons are enabled by default for all existing published calendars and any new calendars you published, however if you do not want to have these options displayed for your events, you can disable these options.
To Disable the Post to Facebook & Twitter option
If you do not want to see the Post to Facebook and Post to Twitter options on the Event Detail view for your events you can disable these options. First select your published calendar in Trumba and click Publish Settings>Calendar Spuds tab and then click Edit Settings & Styles for the Event Detail view. Locate the Footer section and you will see the options to “Show post to Facebook” and “Show post to Twitter” which are enabled by default and if you would like to disable one or both, you can change the setting to “No” and click OK.
Additional Information about images:
When using images with events, Facebook requires all images to be 100 pixels or larger. Anything smaller than 100 pixels will not display in Facebook and may produce an error posting to Facebook. The post to Facebook will always try to pull in the Event Image and if it cannot, it will pull in the Detail Image. For example, if you have an event on your calendar and you are using just the Event Image field and that image is 70px x 70px, the event will post on Facebook without an image. If you are using both an Event Image and a Detail Image and both are 100px or larger, the Event Image will display with the Facebook post. If you are using both an Event Image and a Detail Image and the Event image is 70px x 70px and the Detail Image is 400px x 250px, the Detail Image will display with the Facebook post.
-
One other idea for you, if you do have a featured levels custom field set up on your account, you would use the Photo Upcoming Promotion spud and there is a setting within the Promotion Spuds to only display specific featured levels. You could position this promotion spud on your home page and it will link back to your main calendar page. There are also settings for the promotion spuds to only show the current days events. I think the promotion spud may work better for you instead of a main calendar if you plan on just showcasing a few featured events on the home page.
Steve


Calendar is wider than the maximum width for my web page's content
in Publishing, Sharing, and Emailing Calendars
Posted
If you want to make the calendar fit into a set space that's narrower than the default calendar width, you can place it into a DIV tag, using the best width and height for your page, and use the overflow attribute to add scroll bars to the DIV container. For example,
<div style="width:400px; overflow:auto;">
<script type="text/javascript" src="//www.trumba.com/scripts/spuds.js"></script>
<script type="text/javascript">
$Trumba.addSpud (
{ webName: "yourcalwebname",
spudType: "spudtype" });
</script>
</div>
Special case: Multi-day template
The Multi-day template requires a width of nearly 800px and behaves a little differently than the others. If your calendar uses this template, and you want it to fit into a narrower space, you need to take the code above one step further.
First, you need to create a DIV for the dimensions you want the calendar to fill on your page. Then you create a second DIV to hold the calendar. This is what the code looks like:
<div style="width:400px; overflow:auto;">
<div style="width:800px;>
Spud code
</div>
</div>